The ability to create reliable APIs is essential in today’s web development environment. I’ll show you how to create a RESTful API in this post that stores and retrieves data using Node.js, Express.js, MongoDB, and TypeScript.
Requirements:
Before we start, please ensure that you have:
Step 1: Setting Up the Project
First, let’s initialize our Node.js project, for this first create a project directory. I created node-test-api directory and from directory, run init command:
mkdir node-test-api
cd node-test-api
npm init -y
Step 2: Initialize the TypeScript in Project by following commands.
npm install typescript ts-node @types/node --save-dev
npx tsc --init
Step 3: Installing Dependencies
We’ll need the following packages:
npm install express mongoose body-parser cors dotenv
npm install --save-dev @types/express @types/mongoose @types/cors @types/body-parser nodemon
Some installed package details:
Step 4: TypeScript Configuration.
Create a file “tsconfig.json” on root of the project and add following code.
{
  "compilerOptions": {
    "target": "ES2020",
    "module": "commonjs",
    "outDir": "./dist",
    "rootDir": "./src",
    "strict": true,
    "esModuleInterop": true,
    "skipLibCheck": true,
    "forceConsistentCasingInFileNames": true,
    "moduleResolution": "node"
  },
  "include": ["src/**/*"],
  "exclude": ["node_modules"]
}
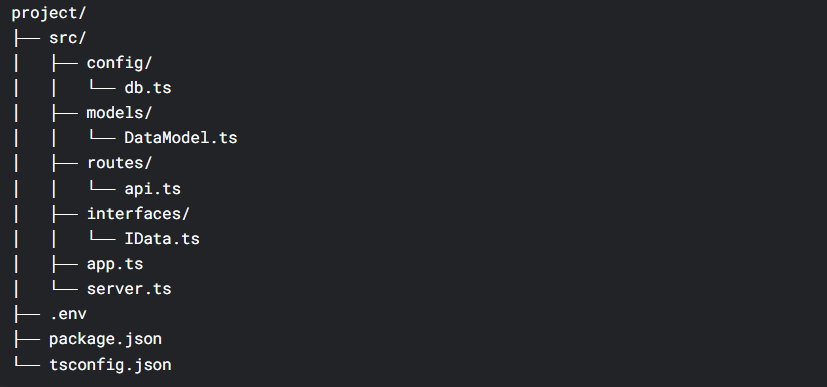
Step 5: Project Structure.
I am going to use the following directory structure for the project:
Step 6: Create TypeScript Interfaces.
Create IData.ts file in “src/interfaces/” directory and add following code in that file.
import { Document } from 'mongoose';

export interface IData extends Document {
  title: string;
  description?: string;
  createdAt?: Date;
}
Step 7: Create Data Model file.
Create “DataModel.ts” file in “src/models” directory and add following code.
import { Schema, model } from 'mongoose';
import { IData } from '../interfaces/IData';

const DataSchema = new Schema<IData>({
  title: {
    type: String,
    required: true
  },
  description: {
    type: String,
    required: false
  },
  createdAt: {
    type: Date,
    default: Date.now
  }
});

export default model<IData>('Data', DataSchema);
Step 8: MongoDB Connection Setup.
Create “db.ts” file in “src/config” directory with following code.
import mongoose from 'mongoose';
import dotenv from 'dotenv';

dotenv.config();

const connectDB = async (): Promise<void> => {
  try {
    await mongoose.connect(process.env.DB_URI as string, {
      useNewUrlParser: true,
      useUnifiedTopology: true
    } as mongoose.ConnectOptions);
    console.log('MongoDB connected successfully');
  } catch (err) {
    console.error('MongoDB connection error:', err);
    process.exit(1);
  }
};

export default connectDB;
Step 9: Setup Express Server.
Create “app.ts” file in “src” directory with following code.
import express, { Application } from 'express';
import bodyParser from 'body-parser';
import cors from 'cors';
import apiRoutes from './routes/api';
import connectDB from './config/db';

const app: Application = express();

// Middleware
app.use(bodyParser.json());
app.use(cors());

// Database connection
connectDB();

// Routes
app.use('/api', apiRoutes);

export default app;
Now create “server.ts” file in “src” directory and add following code in it.
import app from './app';
import dotenv from 'dotenv';

dotenv.config();

const PORT = process.env.PORT || 5000;

app.listen(PORT, () => {
  console.log(`Server running on port ${PORT}`);
});
Step 10: Create routes.
Create a file “api.ts” in “src/routest” directory. Add the following code.
import { Router, Request, Response } from 'express';
import Data from '../models/DataModel';

const router = Router();

// Get all data
router.get('/data', async (req: Request, res: Response) => {
  try {
    const data = await Data.find();
    res.json(data);
  } catch (err: any) {
    res.status(500).json({ message: err.message });
  }
});

// Get single data
router.get('/data/:id', async (req: Request, res: Response) => {
  try {
    const data = await Data.findById(req.params.id);
    if (!data) return res.status(404).json({ message: 'Data not found' });
    res.json(data);
  } catch (err: any) {
    res.status(500).json({ message: err.message });
  }
});

// Create data
router.post('/data', async (req: Request, res: Response) => {
  const newData = new Data({
    title: req.body.title,
    description: req.body.description
  });

  try {
    const savedData = await newData.save();
    res.status(201).json(savedData);
  } catch (err: any) {
    res.status(400).json({ message: err.message });
  }
});

// Update data
router.put('/data/:id', async (req: Request, res: Response) => {
  try {
    const updatedData = await Data.findByIdAndUpdate(
      req.params.id,
      {
        title: req.body.title,
        description: req.body.description
      },
      { new: true }
    );
    if (!updatedData) return res.status(404).json({ message: 'Data not found' });
    res.json(updatedData);
  } catch (err: any) {
    res.status(400).json({ message: err.message });
  }
});

// Delete data
router.delete('/data/:id', async (req: Request, res: Response) => {
  try {
    const removedData = await Data.findByIdAndDelete(req.params.id);
    if (!removedData) return res.status(404).json({ message: 'Data not found' });
    res.json({ message: 'Data deleted successfully' });
  } catch (err: any) {
    res.status(500).json({ message: err.message });
  }
});

export default router;
Step 11: Setup .env file with variables.
DB_URI=mongodb://localhost:27017/node_api_ts
PORT=5000
If you want to use MongoDB Atlas then your URI would look like following:
mongodb+srv://<username>:<password>@cluster0.mongodb.net/node_api?retryWrites=true&w=majority
Step 12: Running the Server, your package.json file should look like as follows:
"scripts": {
  "start": "ts-node src/server.ts",
  "dev": "nodemon src/server.ts",
  "build": "tsc",
  "serve": "node dist/server.js"
}
Now test the Application.
npm run dev
Try out this code and let me know in the comments if you have any issues. I will try to help you. Thanks
Choosing the right ecommerce platform can make or break your online business. But is Shopify…
Most "AI agent" content online is still stuck at the demo stage — a slick…
If you've been using Claude Code as little more than a fancy autocomplete — typing…
When building real-world Laravel applications, email handling quickly becomes scattered. You send emails from controllers,…
Build flexible, readable, and secure query filters across multiple Laravel models — no more bloated…
Artificial Intelligence is transforming how we work, create, and earn. But most people get stuck…